
People Counter Installation Guide: Mounting Height, Placement & Calibration (2026)
Most “inaccurate” people counters are not bad hardware. They are good sensors installed in the wrong place, at the wrong height or with a counting line drawn in the wrong spot. Installation quality is the single biggest factor in counting accuracy that you control. This people counter installation guide covers mounting height, placement, field of view, calibration and validation so your data is right from day one.
Still choosing hardware? Read how to choose the right people counter first, then come back here before installation day.
Step 1: Survey the Entrance
Before ordering brackets, walk every entrance and note:
- Entrance width – determines how many sensors you need or which lens to choose.
- Ceiling height and type – solid, suspended tile, open ceiling, or glass canopy.
- Obstructions – door closers, signage, security gates (EAS pedestals), heaters and air curtains.
- Lighting conditions – strong sunlight, glass façades or reflective floors can affect some optical sensors.
- Power and network – is PoE available, or will you need a new cable run?
- Traffic behavior – where people queue, linger, or cross the entrance without entering.
Step 2: Get the Mounting Height Right
Every overhead sensor has a supported height range set by its lens. Too low and the field of view is too narrow to cover the entrance; too high and people appear small, reducing accuracy. Always follow the manufacturer’s specification, but these ranges are typical:
| Sensor type | Typical mounting height | Typical coverage width |
|---|---|---|
| 3D stereo vision | approx. 2.2 – 6 m depending on lens | roughly 1 – 1.5× mounting height |
| Time-of-Flight (ToF) | approx. 2.2 – 5 m | roughly equal to mounting height |
| Thermal | approx. 2.2 – 5 m | varies with lens angle |
| LiDAR | ceiling or wall, wide range | very wide; one unit can cover large openings |
| Horizontal beam / IR | approx. 1.0 – 1.4 m on door frame | single doorway |
Ranges are indicative only – check the datasheet of your specific model.
Step 3: Choose the Right Position
Place the sensor inside, not over the door
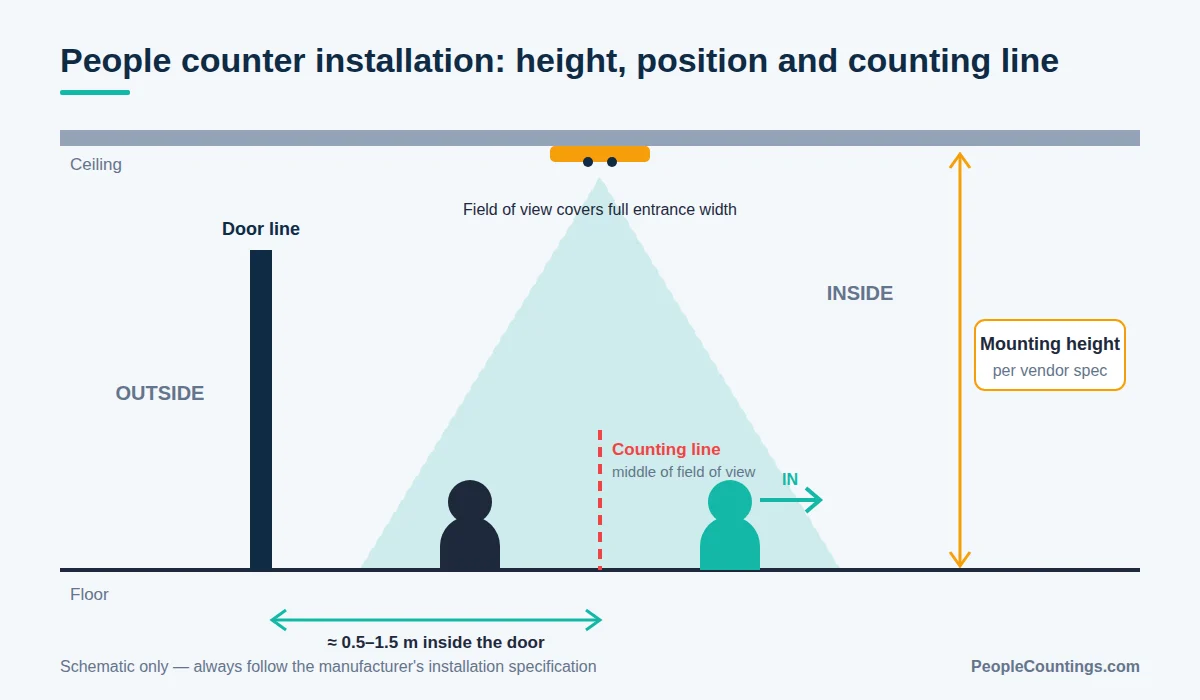
Mount the sensor slightly inside the entrance, typically 0.5–1.5 m back from the door line. This keeps the door leaf, sunlight and outdoor weather out of the field of view and gives people time to separate into a natural flow.
Center it on the flow of traffic
The sensor should be perpendicular to the direction people walk, with the full width of the entrance inside its view. For wide entrances, use multiple sensors with overlapping coverage that the system can merge (“stitching”) to avoid double counts.
Avoid dwell zones
Do not install directly above promotional stands, baskets, trolley bays or areas where people stop to talk. Lingering people walking back and forth can generate extra crossings.
Keep away from heat and air movement
For thermal sensors especially, avoid placing the device near heaters, air curtains or HVAC outlets.
Step 4: Draw the Counting Line
Most modern sensors let you configure a virtual counting line or zone in software. Good practice:
- Place the line across the middle of the field of view, not at the edge.
- Make it span the full entrance width so nobody can walk around it.
- Set the “in” direction clearly and test it with a few walk-throughs.
- Use exclusion zones for areas where people walk past the entrance without entering.
Step 5: Configure Filters
- Height filters – exclude trolleys, strollers and small objects; decide whether children should be counted.
- Staff exclusion – use badge tags, dedicated staff entrances or adjustments so employees don’t inflate traffic.
- Group handling – 3D and AI sensors can separate people walking side by side; verify this with group walk tests.
- Operating hours – ignore counts outside opening hours (cleaners, deliveries) if they are not relevant.
Step 6: Validate Accuracy
Never trust a new installation without a validation test. The standard method:
- Record or manually count traffic at the entrance for at least several 15-minute periods, covering both quiet and busy times.
- Compare the manual counts with the sensor counts for the same periods, separately for “in” and “out”.
- Calculate accuracy as
1 − |sensor − manual| / manual. - If accuracy is below the vendor’s specification, adjust position, line or filters and test again.
Repeat validation after store refits, entrance changes, or every 6–12 months as part of routine maintenance.
Common Installation Mistakes
- Mounting above the door so the door leaf swings through the view.
- Using one sensor for an entrance wider than its coverage.
- Counting lines too close to the edge of the field of view.
- Ignoring a secondary entrance (car park, mall corridor) so totals are incomplete.
- No staff exclusion in small stores, where employees can be a large share of crossings.
- Skipping validation, then making business decisions on unverified data.
Frequently Asked Questions
How many people counters does an entrance need?
It depends on the entrance width and the sensor’s coverage at your mounting height. A single sensor often covers a standard double door; wide mall or airport entrances may need several stitched together.
Can I install people counters myself?
Simple battery-powered beam counters are DIY-friendly. Overhead 3D, ToF and LiDAR sensors usually benefit from professional installation and commissioning, especially when PoE cabling and calibration are involved.
How long does installation take?
For a single store with existing cabling, typically a few hours including configuration and a basic validation test. Large sites need a site survey and phased rollout.
What accuracy should I expect?
Well-installed overhead 3D and LiDAR systems are commonly specified in the high 90s percent. Beam counters are cheaper but struggle with groups walking side by side.
Get It Right the First Time
A careful site survey, correct height and position, a well-placed counting line and a proper validation test make the difference between data you can trust and numbers nobody uses. Compare suitable technologies in our technology comparison, browse the top 50 providers, or request a free quote for professional installation.
